How to use #CSpect on your Mac (in Q & A form)
First things first: How’s that even possible?
Answer: via the magic of Microsoft’s .NET. #CSpect was completely re-written by Mike Dailly in C# which immediately made it portable to any platform that can run .NET or mono (which is the open source equivalent of .NET for MacOS, Linux, FreeBSD etc). Unlike ZEsaruX, #CSpect doesn’t require recompilation for a different platform; you only need .NET to run it.
So can I run it on <insert platform here>?
Answer: Most likely YES. You can run it on Linux whereas this is on a Mac or an Raspberry Pi or a plain old PC and a few other platforms .NET/mono runs on. This tutorial however deals with MacOS exclusively so you’ll have to wait for a special tutorial for other platforms.
What do I need?
Answer: You’ll need three (and a half) things: #CSpect, a System/Next SD Image, Homebrew (that’s the half) and finally mono.
First you need the latest and greatest version of #Cspect (downloadable from www.cspect.org). Pick a folder to decompress it on your Mac and then proceed to get a System/Next SD card image from www.zxspectrumnext.online/cspect/ You can pick any one you like depending on your needs, then decompress it in the same folder you decompressed your #CSpect in. After that you need to install Homebrew (read about that from http://brew.sh) by entering:
/usr/bin/ruby -e "$(curl -fsSL https://raw.githubusercontent.com/Homebrew/install/master/install)"
in a terminal window (you’ll find the MacOS Terminal in Applications > Utilities) or by:
Using Finder
- Open Finder.
- Click Applications.
- Click Utilities.
- Double-click Terminal.
Using Spotlight
- Click the Spotlight icon.
- Type terminal into the search box.
- Double-click Terminal.
Once Homebrew is installed, you’ll be able to to install mono which is as easy as giving the following command in your Terminal window:
brew install monoYou’ll see a few things running and once your terminal settles, you’re ready to run #CSpect
Is that all?
Answer: Not quite. I’m assuming you want audio too. #CSpect needs one little tiny extra called OpenAL. You can download it from the OpenAL site but for your convenience it’s also located in the System/Next Images site as well right here. Drop the decompressed file in the SAME FOLDER you decompressed #CSpect in.
Can I play now?
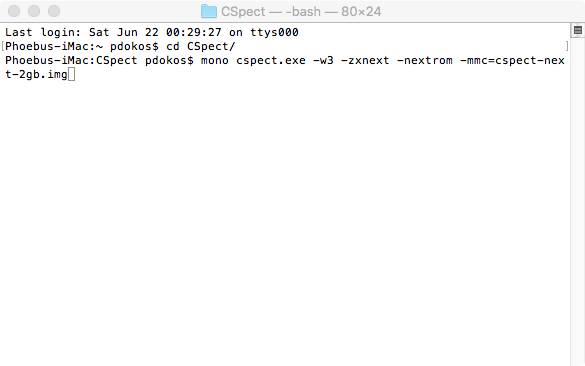
Answer: Absolutely. Let’s assume you decompressed CSpect into your home folder in a folder named Cspect. Then still using the terminal change the folder to that by giving:
cd CspectThen run #CSpect by giving:
mono cspect.exe -w3 -basickeys -zxnext -nextrom -mmc=../cspect-next-2gb.img You’ll notice that the example above is different from the screenshot below. It includes an extra switch (-basickeys) and the –mmc switch is written a bit differently. This only affects the way the keyboard behaves (makes you find your keys a bit easier)

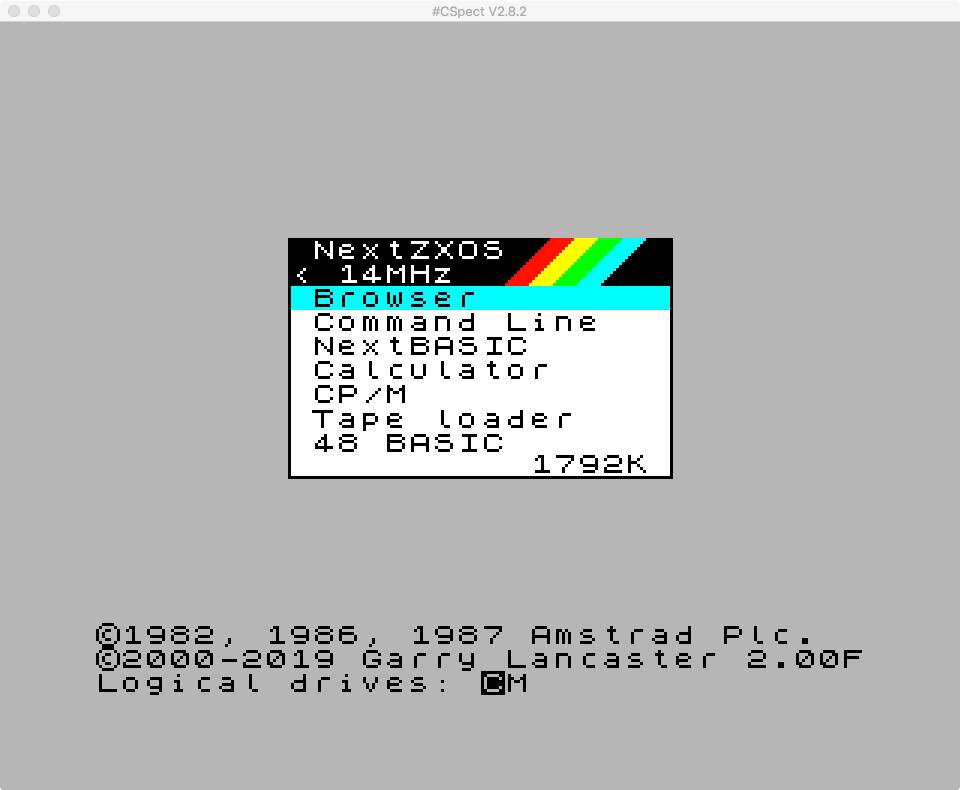
And here it is running just perfectly

So is that all there is to know?
Answer: Pretty much yeah! Well… there are a few things:
- #CSpect NEEDS two files from the SD Card image enNextZX.ROM and enNxtMMC.ROM that need to be present in the same folder as the SD Card image. If you decompress the SD card image from the System/Next SD Image site you’ll find they’re included for your convenience. If you later update the contents of the SD Card image to a newer version of NextZXOS , then you need to MANUALLY copy the new versions of those two files into the folder containing the SD Card image.
- The -mmc switch has TWO distinct uses: One is to provide access to the underlying OS when NOT in full (ie running Next ZXOS) ZX Spectrum Next mode and the other to attach an SD Card Image when in full ZX Spectrum Next mode. You CANNOT (currently) decompress the System/Next image onto a folder of your computer and expect #CSpect to boot from there. It won’t.
Ok, I’ve done all that and it works but the mouse is giving me trouble!
(The following section was contributed by Rob Uttley – Thank you Rob!)
You can get the Mac to move the window for you, using AppleScript.
#CSpect runs using mono as we examined above, so we’re just crudely going to tell the Mac to tell mono to move its window.
Fire up Script Editor (type that into Spotlight; it’ll also be hiding in one of the Application Folders somewhere but life’s too short for that nonsense).
In the editor, type this;tell application "System Events" to tell process "mono" set position of windows to {55, 55}end tell
To make it a clickable desktop app, from Script Editor‘s file menu choose Export, set the file format to be Application, check the Run only box and save it to your desktop eg. ResetCSpectWindow. You’re almost done now. (There is a way of doing this at the terminal prompt too so if you’re interested in doing that, read on below).
So now you have a new icon on your desktop, called something like ResetCSpectWindow. Fire-up #CSpect now as discussed previously. I’m assuming the #CSpect window is in the middle of your display, but wherever/however, as long as the window isn’t in the top left corner you’re going to be able to test that this works.
The first time you double click your new icon, it won’t work. The Mac will jump in and tell you that your app ResetCSpectWindow needs permission to do Assistive type stuff, and you’ll be prompted to go to the System Preferences > Security & Privacy, and on the Privacy tab find ResetCSpectWindow in the list of allowed apps and tick the box. You’ll need your user password to make this change to your Mac.
Once that’s been done, subsequent double-clicks on your new icon will move the #CSpect window back to the top-left (if it’s running, natch).
This isn’t elegant but it might well save your frustration levels if you’re in the middle of playing something, or doing some pottering, and the bloody mouse goes and buggers up the window.
There are ways of running this from the terminal, as promised;
if you’ve made an app from above , typing:open ResetCSpectWindow.app
at the Terminal in the right folder should do it, but you can also export the script as a script (with a .scpt extension) into your usual Terminal folder (where you probably hang out using hdfmonkey like all the cool kids do, etc etc) – you can launch the script usingosascript ResetCSpectWindow.scpt >nul 2>&1
where that extra gubbins is just saving your terminal session from lines and lines of Apple gubbins.
As with the app variant though, the first time you run it you’re going to need to go through the Privacy & Assistance permission stuff for your script (and possibly for Terminal, too).
